 pyomn
pyomn

Crotons offer a splash of color to any environment. With thick, leathery leaves that have a shiny surface and that grow in a wide variety of colors, they’re admired as an ornamental. They even flower, with both male and female flowers on a given plant — but their inflorescence pales in comparison to the red, orange, yellow, black, even green or bluish-purple hues that the leaves produce.
While there is an entire genus called croton, today we’re focusing on Codiaeum variegatum. The garden croton or variegated croton is a stunning houseplant which is widely popular, and which has tons of varieties available. Let’s go over everything there is to know about this particular croton species and get you started!
Croton Overview

| Common Name(s) | Croton |
| Scientific Name | Codiaeum variegatum |
| Family | Euphorbiaceae |
| Origin | Europe |
| Height | Up to 10 feet |
| Light | Direct sunlight, filter harsh light |
| Water | Average |
| Temperature | 60-80°F |
| Humidity | High |
| Soil | Rich soil, fast draining |
| Fertilizer | Regular feedings of acidic fertilizers |
| Propagation | Root or stem cutting |
| Pests | Mealy bugs, caterpillars, spider mites or scale insects. |
Types of Crotons
There are hundreds of varieties of crotons, so today we’ll highlight a few of my favorites. If none of these appeal to you, don’t stop looking. There’s a croton variety out there for every color and leaf-shape preference!
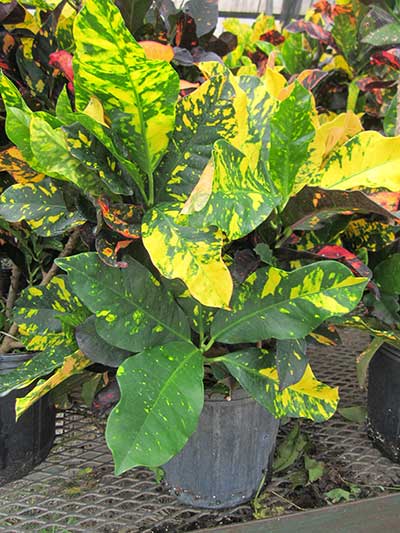
Codiaeum variegatum ‘Gold Dust’
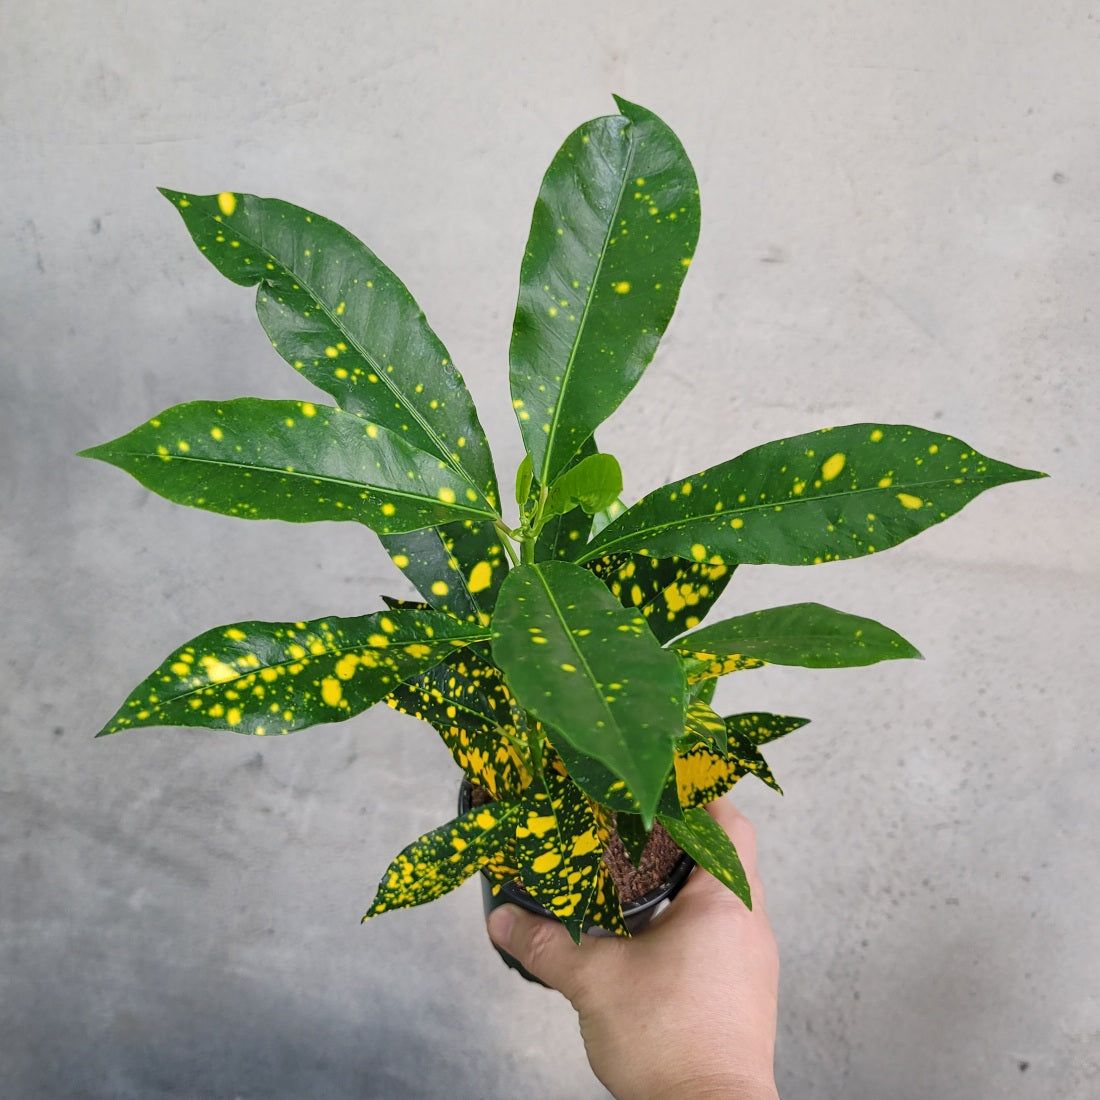
This particular croton has vibrantly green leaves that look as though someone splashed golden-yellow paint all over them. In frost-free areas, it’s common as a landscaping shrub, but it can easily be grown indoors as well. Its leaves are rounded ovals with almost a waxed surface shine.
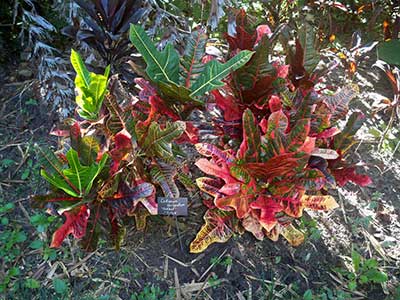
Codiaeum variegatum ‘Mammy’
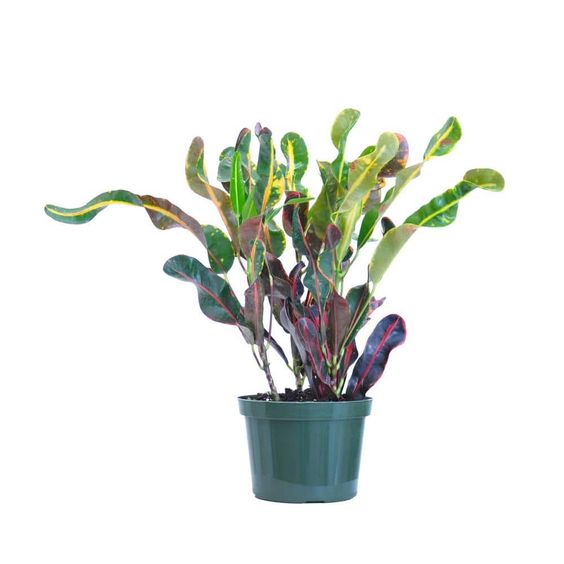
The Mammy varietal is stunning to look at, as its twisted, multi-hued leaves look like long streamers erupting out of its container. Grown indoors, its leaves are more subtle in coloration, tending towards greens and purples with bits of red, but if grown in bright light environments it rapidly transforms into an explosion of brilliant color.
Codiaeum variegatum ‘Petra’
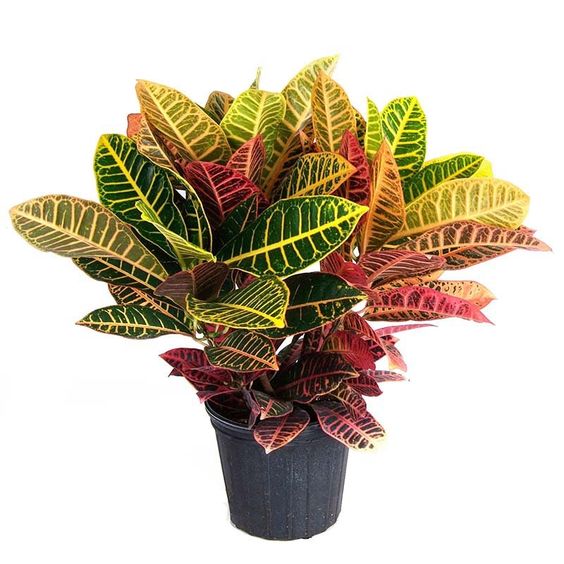
One of the most common croton varieties available, Petra’s leaves are green with bold yellow, red, or orange veining and edging. It gives the pointed-oval leaves a lacy appearance when viewed from a slight distance.
Codiaeum variegatum ‘Mother and Daughter’
This unique croton plant has interesting dual leaves. Long and slender, they come to a rounded tip from which the central leaf vein extends, with a secondary leaf attached to it. They grow in variegated shades of green to purple, and are really interesting plants to keep!
Codiaeum variegatum ‘Red Iceton’
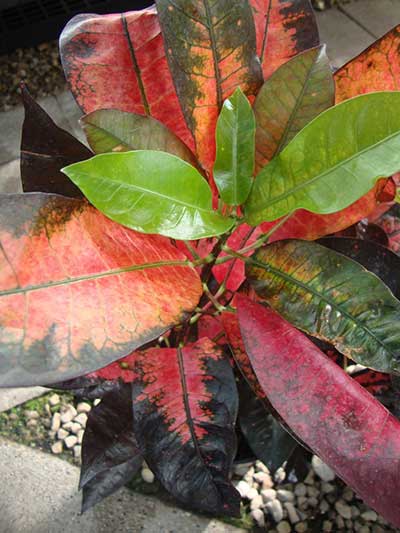
Red Iceton is one of the more striking croton varieties. Its pointed-tipped oval leaves go through a color change – when new, they are a bright, warm yellow. As the leaves age, they shade into red and pink hues.
Codiaeum variegatum ‘Magnificent’
The Magnificent croton is similar to the Gold Dust croton in both leaf shape and dappled patterning, but that’s where the similarities end. This variety has brilliant shades of red, orange, pink and yellow spattered across the leaves. Occasionally there will be bits of bronze or a purplish hue as well. It’s truly magnificent, just as its name implies.
Codiaeum variegatum ‘Oakleaf’
This interesting croton variety gets its name from the shape of its leaves, which resemble the multi-fingered oak leaf shape. Its coloration tends to run from greens to bronzes with red, orange, or yellow veining.
Codiaeum variegatum ‘Eleanor Roosevelt’
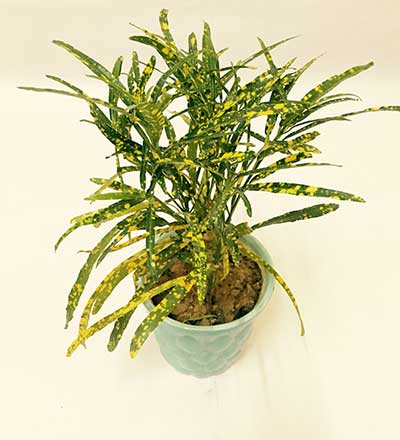
A stunning change from other croton varieties, the Eleanor Roosevelt has long, slender leaves. The base hue of the leaves is a nice medium green, but they shift to a deep purple, and all of the leaves are dotted with a golden-yellow spotted pattern. This unique variation provides a shift from the broader leaves of other varieties.
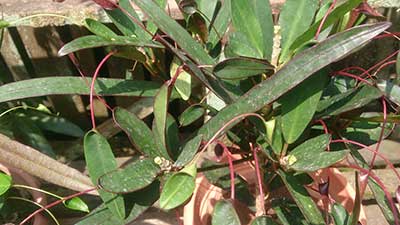
Codiaeum variegatum ‘Zanzibar’
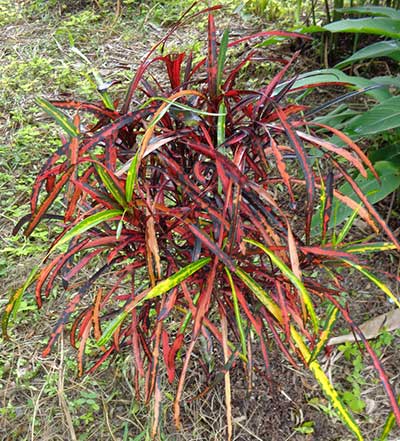
For those who like grassy-looking plants, there’s a croton for you, too! The Zanzibar croton has such slender leaves that they resemble blades of grass, and they are dolloped in shades of purple, orange, gold and even red. These make a beautiful contrast to their broad-leaved sibling plants and still share the bright colorways of their species.


Caring For Crotons
Crotons have a reputation for being fussy plants, but that’s partially related to the fact that they don’t like being moved much — they like to stay in one place. Once your plant has gotten over its initial shock (and possibly leaf loss) from being moved around, following these guidelines will give you the best-looking croton foliage.
Light
Crotons love bright light and thrive in it, and in fact require it to produce those stunning multicolored leaves. But they also don’t like to be burned by the sun. If you are in a very hot or dry environment where the sun is oppressive, it is a good idea to put some shade cloth up so that they can absorb less of the direct UV rays during the heat of the day. If grown indoors, they do prefer brighter spots near windows or under grow lights.
Water
Like most tropical plants, crotons like humidity. It’s often beneficial to set your croton plant on top of a rock tray with a little water in it to help keep the moisture up around the plant. If you’re raising yours as a hanging plant, occasional misting will also help increase the ambient humidity. However, they also don’t like to have wet feet, so it’s best to only water them when the top half-inch to an inch of soil is dry to the touch. When you do water them, water until it starts to come out of the bottom of the container, then wait until the soil dries out again before rewatering.
Crotons can be susceptible to over-watering. If you find that your croton’s leaves are wilting, that may be a sign of too much water. If the lower leaves are drying out or falling off, that’s a sign of under-watering and your plant’s thirsty.
Soil
Crotons prefer a well-draining soil with lots of organic material. Most good potting soils are fine, and an ideal range for the soil pH level is between 4.5-6.5 pH. High pH rock soils are not advisable, as are soils that are very calcium-rich.
Fertilizer
A popular fertilizer type for crotons is an 8-2-10 mix, as they tend to like a lot of potassium. Most often, they’re fed once in the early spring (Feb-March), and then again in the late spring (May), giving them a good slow-release acidic fertilizer that will feed them throughout the summer months. Younger plants may require a third feeding somewhere mid-July. Don’t fertilize in the fall, as the leaves need to mature and harden off before winter.
Propagation
There are a few choices in how you can propagate your crotons.
The most common is via cuttings. Trim a segment from your croton that has at least three sets of leaves using a sharp, clean pair of shears. Strip off all but 3-5 leaves from the top of the stem. You can place this directly into a glass of water, or can dip it into a rooting hormone and then place it into a mix of vermiculite, river sand, and peat moss. It helps if you can place a cover over the plant to help keep it humid as it develops roots, but if you don’t have a glass cloche or other humidity-trapping cover, you can use a plastic bag to simulate one. Once roots have formed, transplant it gently into a good, well-draining potting mix.
Some people have found it possible to separate crotons at the root, especially if the plant has outgrown its prior container. However, this can be occasionally problematic, as the plant really doesn’t like being moved around much, and both your original plant and the new cutting may suffer wilting and leaf-loss this way.
Finally, there’s a process called air layering. In this process, you make a diagonal cut through one third to half of the diameter of a stem while it’s still attached to the main plant. Treat the resulting wound with some rooting hormone, and keep it open with a wooden matchstick or toothpick.
Then, carefully pack damp sphagnum moss around the area, and wrap it in plastic wrap. Make sure it’s kept moist – if the moss begins to turn tan in color, it needs to be remoistened. The wound will begin to form roots in time. Once those roots have developed, unwrap the plastic wrap, trim the rest of the way through the stem, and repot your new plant in a well-draining potting mix.
Repotting
As your croton grows, it will eventually get to the point where it needs a larger pot. Select a pot that’s only 1-2 inches larger in diameter than its current one, and take some of your potting mix and place some in the bottom of the new pot. Then, carefully and gently remove your croton from its old pot.
If it appears to be a bit root-bound, separate the roots slightly with your fingers. If they’re too interlocked, use a potting knife to score the roots lightly. Then place the croton into the pot, making sure there’s enough potting soil below to put it within an inch of the pot’s top. Carefully fill around the sides of the plant with additional potting soil as needed, and then water it thoroughly to moisten all of the soil and help it settle, stopping when water comes out the bottom of the pot.
Pruning
Generally, crotons only need to be pruned to remove dead or unhealthy foliage or to maintain a compact size. If you need to prune your croton, I highly recommend wearing gloves, as the croton’s milky sap can occasionally cause skin irritation (read the FAQ below for more information on this!). Use a sharp, clean pair of bypass loppers or shears to make your cuts.
Dead leaves and branches should be pruned all the way to the main body of the plant. Diseased branches should be cut off at least six inches outside of the diseased area, ideally just above a leaf or node on the stem. Long or overgrown branches should also be cut back just above a leaf or node on the stem to maintain the plant’s shape.
Unless the branches are dead or diseased, avoid cutting more than a third of a branch’s length off at any given time so you don’t stress the plant. Allow it to form new leaf growth before pruning it again.
Problems
Are the leaves on your crotons starting to pick up whitish-yellow speckling that’s not normal to the plant? Is something eating it? Is your plant not as colorful as it should be? Here’s some answers to what might be causing your issues and how to fix them.
Growing Problems
Probably the most common growing problem that people may experience is their croton staying… well, green, honestly. If you have something like a Mammy or a Magnificent, or any other that’s supposed to be vibrantly colored, and yet it’s all green, this is usually a sign of incorrect lighting. While crotons don’t mind partial shade (and a few varieties prefer it), a lack of color generally means it’s just not getting enough light to produce those bright tones. Crotons prefer bright light and cool temperatures in the 60-80 degree range, and if you can provide that environment, you should have stunning colors regularly.
If your leaves face directly into the summer sun, you may notice greyish patches on your leaves. This generally means that the leaves are fading due to too much heat with their light. Adding some shade cloth or repositioning your plants to a location which is naturally shadier during the hottest parts of the day will help.
While some varieties such as Mammy naturally twist, if your croton is not one of those, finding twisted leaves on it is a sign of over-fertilization. This is most common during the summer months when your plant shouldn’t be fertilized as much. Stick with a couple feedings in the spring (one early, one late), and refrain from feeding throughout the rest of the year.
I mentioned earlier that crotons don’t like to be moved around, and this is very true — they can experience leaf loss just from being brought home from the store. As long as you are not regularly carrying your plant in and out of the house, or moving it too regularly if it’s planted outdoors, this should not be an issue.
Pests
Croton houseplants are typically most susceptible to spider mites. They cause the leaves of your plant to become speckled with yellow (which can be hard to see in some croton varieties!), and eventually will cause the leaves to die. These little pests can be removed by gently cleaning off the leaves of your plant with a moistened towel, and keeping the humidity up can help prevent them.
Outdoors, there are a few more pests that are common. One of these is the croton scale, which is a strange little insect that is hard to identify as it makes itself look like it’s just part of the plant. This video shows you some examples of croton scales when they’re infesting a croton plant. Treatment with neem oil or another horticultural oil every 5-7 days for 3-4 treatments is effective at removing these, but if your plant is in dire straits, using a soft toothbrush to brush off the scales can help too.
Mealybugs on your plants can occasionally become an issue as well. You can remove smaller colonies by dabbing them with a cotton swab that’s been dipped in rubbing alcohol. Larger colonies can be sprayed off using a heavy spray of water, or killed off with neem oil insecticide or insecticidal soap.
Petra crotons are particularly susceptible to leaf-burrowing thrips. To control thrips, hose them down thoroughly in the morning with cold water while the insects are still in their resting phase. This treatment can take multiple days to take full effect, so be prepared to set a little of your early morning time aside to wash your petras for up to a week. If they persist, insecticidal soap or neem oil applications are recommended.
Finally, there is the croton caterpillar, Achaea janata. These caterpillars eat the leaves of crotons, leaving behind only the stems and veins of the leaf. Regular applications of neem oil have been effective at reducing leaf consumption, but if the caterpillars persist, BT (Bacillus thuringiensis) can be sprayed onto the plants as well. This bacillus will infect the caterpillars and kill them off, but is harmless to humans and animals as well as to the plant.
Diseases
There are a few diseases which can strike your crotons. Crown gall, leaf spot, oedema, and white powdery mildew are by and large the most prevalent.
Oedema is caused when your croton is taking in more water through its roots than it can actually handle, and looks like blistering on the leaves. Reduce the regularity of your watering until the blistering subsides, and avoid over-watering.
Crown gall is caused by a bacteria (Agrobacterium tumefaciens) that stimulates swollen growths on the stems and leaf-veins of your plant. It impacts many types of plants, including roses, apple trees, blackberries and raspberries, and even crotons. Unfortunately, it’s also notoriously hard to combat. You can carefully cut galls off of the stem with a sharp knife, then treat the wound with a pruning sealer. However, the bacteria comes from the soil, and can live in the soil for up to two years after an infected plant has been removed, so the galls may come back. There are some chemical treatments for crown gall available, but they show limited effectiveness on crotons, so the best course of action is preventative.
Anthracnose, also referred to as leaf-spot or blight, is a fungal issue that develops on many plants including crotons. It causes dark or black water-soaked fungal patches on the leaves of the plant. Treatment with neem oil or a copper spray is recommended. You can also combat this problem by releasing a specific bacillus, Bacillus subtilis, via a special spray formula – the bacillus will consume most fungal developments.
Finally, powdery mildew can develop on plants that regularly end up with moistened leaves. To prevent this, water your plants from the bottom. A regular application of neem oil will also prevent and remove the buildup of this whitish mildew on the leaves.
Frequently Asked Questions
Q: Are croton plants poisonous?
A: Crotons have built up a natural defense mechanism that is poisonous, but they can still be grown as houseplants or outdoor ornamentals. Do not try to eat the leaves or the occasional seeds that form, and prevent children and pets from eating them as well. I also highly advise wearing gloves when doing work on your crotons, as the milky sap can be a skin irritant. If your skin does get irritated by croton sap, putting on a 2.5% hydrocortisone cream after thoroughly washing the surface of the skin can help alleviate any problems. And as with any accidental ingestion, if someone does eat the flowers, seeds, or leaves of your croton plant, get them to the doctor or the vet for assistance as soon as possible.
Q: Are poinsettias a type of croton?
A: While poinsettias are related to crotons, they aren’t crotons themselves. However, just like crotons, they have a milky sap that can cause skin irritation, and they shouldn’t be eaten!
These brilliant tropical plants can really liven up your home or yard, so I definitely recommend trying to grow some in your landscape. The stunning colors are worth it! Do you grow crotons? What’s your favorite variety?